
Beer Faucet Cleaning: Disassembly, Cleaning & Reassembly Instructions
By: Zach George, owner of Barrels and Bottles Brewing in Golden, Colorado.
Beer Faucet Cleaning 101 – This step-by-step guide has everything you need to know to clean your beer faucets on your draft lines! The example used in these instructions is a perlick flow-control faucet. Keep reading because there are downloadable instructions at the bottom of the article!
Pro Tip: Cleaning Your Faucets Is As Important As Cleaning Your Lines!
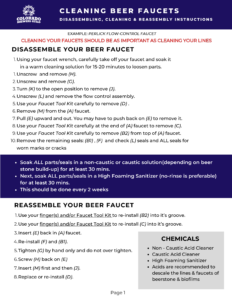
DISASSEMBLE YOUR BEER FAUCET
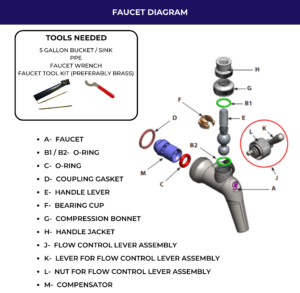
- Using your faucet wrench, carefully take off your faucet and soak it.
in a warm cleaning solution for 15-20 minutes to loosen parts. - Unscrew and remove (H).
- Unscrew and remove (G).
- Turn (K) to the open position to remove (J).
- Unscrew (L) and remove the flow control assembly.
- Use your Faucet Tool Kit carefully to remove (D) .
- Remove (M) from the (A) faucet.
- Pull (E) upward and out. You may have to push back on (E) to remove it.
- Use yourFaucet Tool Kit carefully at the end of (A) faucet to remove (C).
- Use your Faucet Tool Kit carefully to remove (B2) from top of (A) faucet.
- Remove the remaining seals: (B1) , (F) and check (L) seals and ALL seals for worn marks or cracks.
CLEANING THE PARTS
- Soak ALL parts/seals in a non-caustic or caustic solution(depending on beer stone build-up) for at least 30 mins.
- Next, soak ALL parts/seals in a High Foaming Sanitizer (no-rinse is preferable) for at least 30 mins.
- This shouldbe done every 2 weeks.
CLEANING CHEMICALS
- Non – Caustic Acid Cleaner
- Caustic Acid Cleaner
- High Foaming Sanitizer
- Acids are recommended to descale the lines & faucets of beerstone & biofilms
FAUCET REASSEMBLY
- Use your finger(s) and/or Faucet Tool Kit to re-install (B2) into it’s groove.
- Use your finger(s) and/or Faucet Tool Kit to re-install (C) into it’s groove.
- Insert (E) back in (A) faucet.
- Re-install (F) and (B1).
- Tighten (G) by hand only and do not over tighten.
- Screw (H) back on (E)
- Insert (M) first and then (J).
- Replace or re-install (D).
Download the Faucet Cleaning Guide PDF