
One of the most important factors in the quality of fermentation is the number of viable yeast cells in solution. This, in conjunction with the temperature of fermentation, can be optimized to produce the flavor profile desired. This blog will discuss the method for determining how many yeast cells are in a sample. There are many opportunities for error, therefore, each step must be performed precisely and consistently.
Equipment Needed:
- Microscope with combined 400x magnification (40x objective and 10x eye-piece)
- Hemocytometer & cover slip
- Pipets (1.0mL and 10mL)
- Distilled water
- If yeast is clumping, 0.5M EDTA, pH 7.0 can be used. Alternatively, 0.5% Sulfuric acid will work, but it is more hazardous.
- 0.01% Methylene blue
- Below 90% viability, methylene blue is less reliable. Tryptan blue or crystal violet are better substitutes to consider.
- Counting device (hand clicker, cell phone, paper and pen, etc.)
There are several great resources and pitch calculators online, but the ASBC is the standard bearer for best practices in brewery science. Some articles and websites below are recommended reading to see what consistent methods are used and how information can differ by source. Lastly, while online pitch calculators are useful, once you understand the math, I recommend building your own in a spreadsheet. This will give you full knowledge and control over your inputs and greater insight into your yeast management program.
White Labs Cell Counting Tips and Videos
Inland Island Yeast Calculators
Self-made Yeast Calculator Spreadsheet
Basic Procedure:
Collect sample and dilute to usable density
Most often, brewers want to know the yeast count of a slurry or propagation for pitching. However, this method will also work for yeast in solution during fermentation or conditioning. Counting yeast in solution is also a great metric to better understand your fermentation trajectory and catch issues faster. Depending on the concentration of yeast, different dilution rates are necessary. Ideally, you are aiming for a total of 100-500 yeast cells in the entire viewing area of the hemocytometer. A 1:1000 dilution tends to work well for yeast slurries and a 1:20 dilution for fermentation samples, but you should identify the dilutions that are most accurate for your work. Be sure to mix your samples well so they are homogenized. Don’t forget to account for the methylene blue in your volume, as well. It is recommended that 10-50% of your final dilution is the 0.01% methylene blue solution. So, 1mL sample, 1mL methylene blue, and 8mL water would be a total 1:10 dilution.
| Expected Cell Count | Suggested Final Dilution Rate | Preparation Guide: Sample (mL) to Water (mL) |
| 0-20 Million | 1:20 | 5mL to 95mL or 1mL to 19mL |
| 21-50 Million | 1:50 | 2mL to 98mL or 1mL to 49mL |
| 51-200 Million | 1:100 | 1mL to 99mL |
| 200 Million + | 1:1000 (1:10 x 1:10 x 1:10) |
Serial Dilution Dilution 1: 1mL to 9mLDilution 2: 1mL Dilution 1 to 9mLDilution 3: 1mL Dilution 2 to 9mL |
Source: https://www.asbcnet.org/Methods/MicrobiologyMethods/Pages/Yeast-4-MasterMethod.aspx
Confused about calculating dilution factors? Consult the footnote at the end of the post
Prepare and fill hemocytometer
Loading the hemocytometer properly is important for accurate counts and calculations. Some factors that impact the calibrated volume, and lead to inaccurate counts, are a dirty counting chamber, overfilling the chamber so liquid enters the side moats, and using a cover slip not specifically designed for hemocytometers (they are thicker to ensure proper volume).
Source: https://www.bostonapothecary.com/the-hemacytometer-and-a-few-notes-on-distillery-microscopy/
Count viable and dead cells
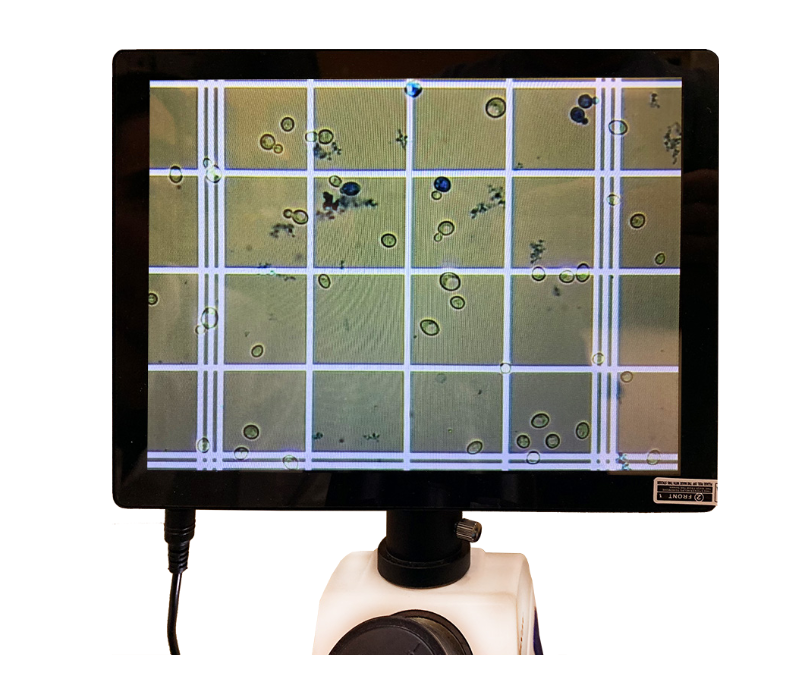
The hemocytometer grid is broken into a 5×5 square. Each of those 25 squares has a 4×4 square within it. A method commonly used within the brewing industry is to count cells in the four corners and center square of the main grid and multiply the total by 5. While this may be a slightly faster method, it is less accurate and introduces unnecessary errors in your calculations. It is strongly recommended that the entire ruled area, 25 squares, is counted. It is also highly encouraged to count 4-6 separate hemocytometer fills and average the values. With enough practice, you will find this does not take long.
To eliminate the possibility of counting some yeast cells twice, it is necessary to standardize the counting technique and use it consistently. Count cells on two perpendicular sides and omit cells on the other two sides. In the figure, the cells on the top and left sides are being counted. The 4×4 spaces are bordered by three lines. Cells touching the inside or center line should be counted. Yeast cells that are budding are counted as one cell if the bud is less than half the size of the mother cell. If the bud is equal to or greater than half the size of the mother cell, both cells are counted. Keep separate counts of live and dead cells to determine viability. Dead cells will stain dark blue, while live cells will be clear, or pale blue in color. Some budding cells will also appear blue but should be counted as living.
Calculate yeast sample density and necessary pitch
As these calculations require multiplying large numbers, small deviations can lead to big differences quickly. It is important to count cells carefully and use exact values in your equations, as much as possible.
To determine the sample density, the total number of cells (living and dead) is multiplied by the dilution factor and the chamber volume correction factor. The chamber has a volume of 0.0001 cm3, so you multiply by 10,000 to get the cells in 1mL (cm3 = mL).
Example: If you counted 220 total cells (207 living/13 dead), in a 1:1000 sample, the result would be:
Density (cells/mL) = (total cells) x (dilution rate) x (10,000)
Density = (220) x (1000) x (10,000)
Density = 2.2 billion cells/mL
Viability (%) = (live cells) / (total cells) x 100
Viability = (207) / (220) x 100
Viability = 94.09%
Now that you have your yeast density and viability, you can determine the pitch volume needed. A good rule of thumb for ales under 16 Plato (P) is 1 million cells per mL per degree Plato. Lagers, or beers above 16P, usually require pitch rates of 1.5-2 million cells/mL/P, possibly more. Determine what pitch rates work best for you in practice.
Example: You brew a 15bbl batch of 12.4P wort to ferment with ale yeast
Cells needed = (12.4P) x (1,000,000 cells/mL/P) x (3785.41mL/gallon) x (31 gallon/bbl)
Cells needed = 1,455,111,604,000 cells/bbl or ~1.455 trillion cells/bbl
Example: If you were fermenting the same wort with lager yeast, the answer would be ~2.183 trillion cells/bbl (substitute 1,500,000 cells/mL/P in the above equation)
You’ll need density, viability, and cells needed to determine how many liters of slurry to pitch into your beer.
Example: Using the same 15bbl batch of 12.4P wort, with ale yeast, and the cell counts above, the calculations would be as follows:
Volume to pitch = (Batch size in bbls) x (Cells needed) / (Yeast density) x (% Viability/100)
Volume to pitch = (15 bbls) x (1.455 trillion cells/bbl) / (2.2 billion cells/mL) x (0.9409)
Volume to pitch = (21.825 trillion cells) / (2,069,980,000 cells/mL)
Volume to pitch = 10,543.58 mL or ~10.54 liters
Many brewers prefer to pitch by weight on a scale. There are different techniques to convert volume to weight; one of the easier methods is to harvest a set volume (full yeast brink is 15.5 gallons) and weigh it. The volume to pitch can then be converted to a pitch weight through a simple ratio. Determine a method that works best for you.
Lastly, as mentioned above, if and how numbers are rounded may result in different final values. Pick a consistent approach in your calculations and adhere to it. Minimizing error propagation will give you the most reliable and accurate results.
Updated by Robert Meehan, Ph.D. Head Brewer, Living the Dream Brewing Company
Footnote on Dilution factors: Source BSI Laboratory Handbook
Consider a 1:10 dilution. The number on the left side of the colon is the volume you begin with; the number on the right is the volume you end up with. A dense slurry may require 1:100 dilution to achieve an appropriate number of cells in the viewing area. You can achieve a 1:100 dilution by adding 1ml sample to 99ml water. Another, more accurate, way to get a 1:100 dilution is to add 1ml sample to 9ml water, mix, then remove 1ml of that suspension and add it to 9ml of fresh water. This is known as a serial dilution.
Two 1:10 dilutions, made in series, are equivalent to a single 1:100 dilution. Similarly, three 1:10 dilutions made in series are equivalent to a single 1:1000 dilution. The final dilution factor is the product of the numbers on the right side of the colon. For example, a 1:10 dilution followed by a 1:4 dilution is equal to a 1:40 dilution and has a dilution factor of 40.