
We have been propagating all of our own yeast at Odell Brewing Company since at least 2009 when I started, and I’m sure we did it for many years before then too. The benefits of cultivating your own yeast are numerous. It gives the brewery complete control from a few colonies all the way up to large scale production. This control allows for process modification and internal quality checks to be run throughout all steps. Running in house props like this also gives very quick feedback on any potential micro concerns should they arise and has the added benefit of getting the knowledge of propagations into the brewery. All of this comes at the expense of time and energy, but the cost savings can be dramatic.
We have three brewhouses at Odell, one 10 barrel pilot system, 15 barrel system in our RiNo Denver Brewery and a 150 BBL main brewhouse. This allows us the opportunity to use three very different, but equally cool, pieces of tight brewing kit for our propagations should it be needed. We also have an in house designed yeast propagation vessel capable of growing a substantial amount of yeast up in a short period of time, which we chiefly use for our production house ale strain. To take a step back, since all breweries basically do the same thing in the world of wort creation, but conversely all vary on how they choose to do it, this blog will focus on getting a lab side prop out towards production. Whatever your full scale production batch size may be, this should still get you moving towards a vessel on your production floor in just under two weeks.
So here we are. Grab yourself a streak plate or slant and let’s get to it. However you source your original colonies it is always a good idea to make some streak plates to ensure the culture is pure. This will lose you a few days, and generally speaking is overkill, but if you avoid dumping one batch in the history of the brewery, it’s worth it. We then select an individual colony to grow up into our first inoculum. For us, since we brew quite often, wort is regularly available, and an ideal culture medium for yeast. We collect enough wort to sterilize three 250mL flasks for inoculation. These flasks are outfitted with foam stoppers, a drop of sterile lab grade antifoam, and a stir bar. The sterile wort is divided up, and inoculated. We run micro on each flask to ensure a clean culture, and then choose the healthiest two of three to inoculate the next step up, a 2L flask.
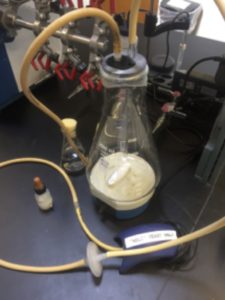
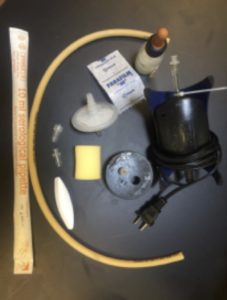
Wort for this intermediate step up is collected in much the same way, but the 2L flask is outfitted with some fancy things. Well, we buy this stuff of the internet (*Amazon and the like*), so it’s not that fancy. Which is kind the whole point of this blog. We use an aquarium pump, pharmaceutical tubing, stir bar, sterile air filter, one way valve, stir plate, a rubber stopper, a serological pipette, and of course just a sprinkle of parafilm. The combination of oxygen injection, in this case by way of sterile air, and agitation is key to getting the most growth in the shortest amount of time. The faster you can roll through lag phase the better your chances at a successful lab scale prop will be.

The last step is to transfer the 2L flask into a modified keg. Similar story here to the 2L flask as far as set up, just a bigger vessel. The spear has been removed on the keg and a modified spear that converts the tavern head to a tri clamp fitting is installed. We also have used cornie kegs and even more purpose built modified kegs for this step. Whichever “keg sized” vessel is chosen, once again sterile air is injected, a sterile stir bar is dropped, samples are collected and off we go. In this way roughly enough cells can be generated to inoculate a standard gravity pilot system batch for our brewery. To ensure proper cell counts, a prop of this size can be chilled, yeast can be racked or the slurry can be feed again to increase cell density. Combining two props in this way is a safe bet to inoculate larger 8-10 BBL batches, or higher gravity stuff. We have also gone so far as to include a small peristaltic pump for recirculation on our larger kegs. Of course, it all depends on the yeast you are using, your feeding wort, and the specific equipment chosen, but after a few rounds of optimization you’ll be on the right track in no time.
Written by Eli Kolodny – Odell Brewing Co.
Photos: Jordan Kelly